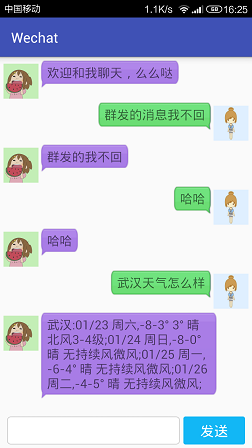
聊天机器人的聊天界面是仿照着QQ来的,加了一个聊天气泡,看起来还看的过去,哈哈,废话不多说,先看看最后的样子吧
主要的用到的控件只有三个一个用于显示消息的ListView,一个Button,以及一个EditText,我们先来看看UI是怎样弄出来的
主布局文件
主布局文件其实没什么好讲的,使用了相对布局,摆放好了三个控件的位置,EditText和Button使用线性布局,然后ListView在它们上面,标题栏是新建项目的时候默认的,没有更改,至于ListView为什么看起来不像平时使用的那么呆板,待会再说,先来看看主布局文件
<?xml version="1.0" encoding="utf-8"?>
<RelativeLayout xmlns:android="http://schemas.android.com/apk/res/android"
    xmlns:tools="http://schemas.android.com/tools"
    android:layout_width="match_parent"
    android:layout_height="match_parent"
    tools:context="com.jay.wechat.MainActivity">

    <LinearLayout
        android:id="@+id/linear"
        android:layout_width="match_parent"
        android:layout_height="50sp"
        android:layout_alignParentBottom="true"
        android:orientation="horizontal"
        android:paddingBottom="5dp"
        android:paddingLeft="10dp"
        android:paddingRight="10dp"
        android:paddingTop="5dp">

        <EditText
            android:id="@+id/tv"
            android:layout_width="0dp"
            android:layout_height="match_parent"
            android:layout_marginRight="5dp"
            android:layout_weight="1"
            android:background="@drawable/edittext_shape"
            android:paddingBottom="1dp"
            android:paddingLeft="5dp"
            android:paddingTop="1dp"
            android:textCursorDrawable="@null"
            android:textSize="20dp" />

        <Button
            android:id="@+id/sendButton"
            android:layout_width="wrap_content"
            android:layout_height="match_parent"
            android:background="@drawable/send_button_shape"
            android:gravity="center"
            android:text="发送"
            android:textColor="@android:color/white"
            android:textSize="20dp" />
    </LinearLayout>

    <ListView
        android:id="@+id/chatList"
        android:layout_width="match_parent"
        android:layout_height="wrap_content"
        android:layout_above="@id/linear"
        android:layout_alignParentTop="true"
        android:cacheColorHint="#00000000"
        android:divider="@null"
        android:focusable="false"
        android:focusableInTouchMode="false"
        android:listSelector="#00000000"
        android:transcriptMode="alwaysScroll" />
</RelativeLayout>
从上面可以很清楚的看到,一个LinearLayout包裹着文本框和按钮,然后ListView在这个线性布局的上面,这里重点要提到ListView几个重要属性
去除ListView的分割线
android:divider="@null"
去除ListView点击时背景颜色发生变化
android:focusable="false"
android:focusableInTouchMode="false"
android:listSelector="#00000000"
android:cacheColorHint="#00000000"
当ListView添加新的项的时候,自动滚到新的项那里
android:transcriptMode="alwaysScroll"
从上面的图中可以看出来,EditText和Button都不是默认的样式,这是因为我设置他们的background属性,使用的是shape.xml,下面只列出EditText的shape.xml
<?xml version="1.0" encoding="utf-8"?>
<shape xmlns:android="http://schemas.android.com/apk/res/android">
    <corners android:radius="5dp" />
    <stroke
        android:width="1dp"
        android:color="#cccccc" />
    <solid android:color="@android:color/white"/>
</shape>
聊天界面的布局ListView
ListView并没有使用特殊的设置,而是在使用的适配器上面做的文章,这里使用的是自定义适配器,关于自定义适配器的用法请参看自定义适配器,主要的是BaseAdapter的getView方法,通过判断消息是属于发出的还是接收的,来加载不同的布局文件
消息的封装,为了便于操作,我将消息简单的封装了,消息包括类型,消息内容,以及头像
package com.jay.wechat;

/**
 * 消息包装类,用于包装一个消息
 * Created by Jay on 2016/1/22.
 */
public class MsgBean {
    //消息类型,发送者还是接受者
    public static final int TYPE_SEND = 1;
    public static final int TYPE_RECV = 2;
    //消息包含数据,一个String,一个联系人头像的id
    private String msg;
    private int pic_res;
    private int msg_type;

    public MsgBean(String msg, int pic_res, int msg_type) {
        this.msg = msg;
        this.pic_res = pic_res;
        this.msg_type = msg_type;
    }

    public String getMsg() {
        return msg;
    }

    public void setMsg(String msg) {
        this.msg = msg;
    }

    public int getPic_res() {
        return pic_res;
    }

    public void setPic_res(int pic_res) {
        this.pic_res = pic_res;
    }

    public int getMsg_type() {
        return msg_type;
    }

    public void setMsg_type(int msg_type) {
        this.msg_type = msg_type;
    }
}
然后我们再看看getView的实现,可以看到,我们根据消息的来源来加载不同的视图
public View getView(int position, View convertView, ViewGroup parent) {
    MsgBean msg = data.get(position);
    View view = null;
    if (msg.getMsg_type() == MsgBean.TYPE_RECV) {
        view = View.inflate(context, R.layout.left_item, null);
        ImageView picleft = (ImageView) view.findViewById(R.id.pic_left);
        TextView textleft = (TextView) view.findViewById(R.id.text_left);
        picleft.setImageResource(msg.getPic_res());
        textleft.setText(msg.getMsg());
    } else if (msg.getMsg_type() == MsgBean.TYPE_SEND) {
        view = View.inflate(context, R.layout.right_item, null);
        ImageView picright = (ImageView) view.findViewById(R.id.pic_right);
        TextView textright = (TextView) view.findViewById(R.id.text_right);
        picright.setImageResource(msg.getPic_res());
        textright.setText(msg.getMsg());
    }
    return view;
}
看看”我“发出的消息对应的布局文件,很简单的一个ImageView,一个TextView,气泡的效果是给TextView设置了一个背景图片,背景图片的格式为*.9.png,关于这种格式的更多解析,请参看Android中的.9.png图片
<?xml version="1.0" encoding="utf-8"?>
<RelativeLayout xmlns:android="http://schemas.android.com/apk/res/android"
    android:layout_width="match_parent"
    android:layout_height="wrap_content">

    <ImageView
        android:id="@+id/pic_right"
        android:layout_width="50dp"
        android:layout_height="50dp"
        android:layout_alignParentRight="true"
        android:layout_marginLeft="3dp"
        android:layout_marginRight="5dp"
        android:layout_marginTop="10dp"
        android:scaleType="centerCrop"
        android:src="@drawable/girl2" />

    <TextView
        android:id="@+id/text_right"
        android:layout_width="wrap_content"
        android:layout_height="wrap_content"
        android:layout_marginLeft="50dp"
        android:layout_marginTop="5dp"
        android:layout_toLeftOf="@+id/pic_right"
        android:background="@drawable/right"
        android:text="hello world too"
        android:textSize="18sp" />

</RelativeLayout>
到这里,我们的布局就说完了,主要是ListView是通过自定义适配器,根据消息的种类来加载不同的视图,源码等说完了聊天功能的实现一起提供下载链接好了,如果有不懂的地方,欢迎给我留言哈。
相关:聊天机器人(二)