简介
当我们使用ROOM、Butterknife等的时候,我们都需要使用到注解,然后相应的三方框架就会在编译期为我们生成对应的代码,为我们生成代码的工具就称为注解处理器(annotation processing)。本篇博客就来介绍如何使用annotation processing为我们生成重复的代码片。
基本步骤
我们在使用Activity以及Fragment的时候,经常需要使用Intent、Bundle来传递数据,不过这样的代码往往都是重复的,本篇博客使用annotation processing来为我们自动完成这些重复代码。
1、创建Android Project。
2、创建annotation Module。这个Module类型为Java Library,仅仅包含需要的注解。
3、创建processor Module。这个Module类型为Java Library,需要依赖我们在第二步中创建的annotation Module,我们在这个Module中进行主要的注解处理以及生成代码,我们可以在这个Module里面使用任何的三方库,因为此Module仅仅在编译期有效,并不会打包到我们的apk中。
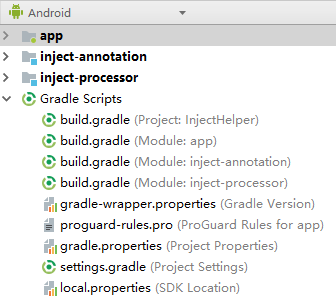
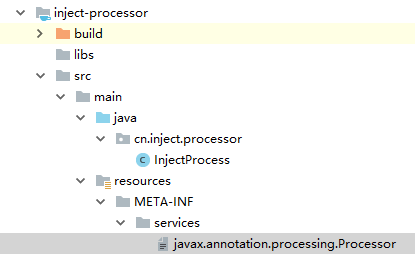
项目结构如下。

4、添加依赖
app需要添加依赖,annotationProcessor project(':inject-processor')说明inject-processor将被作为注解处理器,当编译app的时候则会调用inject-processor进行处理注解。
dependencies {
    implementation project(':inject-annotation')
    annotationProcessor project(':inject-processor')
}
annotation Module不需要任何的依赖
processor Module需要依赖annotation Module
Annotation
首先我们在inject-annotation中定义一个注解
@Retention(RetentionPolicy.SOURCE)
@Target(ElementType.FIELD)
public @interface Inject {
    boolean optional() default false;
}
@interface:说明是一个注解
@Retention:说明注解的生命期
RetentionPolicy.SOURCE —仅仅在源码级别,当被编译以后,注解被丢弃。
RetentionPolicy.CLASS —class级别,注解不会被加载到jvm中。
RetentionPolicy.RUNTIME — 应用级别,在运行时可以获取到的注解。
@Target:说明注解可以生效的目标
public enum ElementType {
    TYPE, //If you want to annotate class, interface, enum..
    FIELD, //If you want to annotate field (includes enum constants)
    METHOD, //If you want to annotate method
    PARAMETER, //If you want to annotate parameter
    CONSTRUCTOR, //If you want to annotate constructor
    LOCAL_VARIABLE, //..
    ANNOTATION_TYPE, //..
    PACKAGE, //..
    TYPE_PARAMETER, //..(java 8)
    TYPE_USE; //..(java 8)

    private ElementType() {
    }
}
Processor
我们在inject-processor中定义一个AnnotationProcessor。我们自定义的AnnotationProcessor需要继承AbstractProcessor并实现process方法。
public class InjectProcess extends AbstractProcessor {

    //获取一些初始化工具
    @Override
    public synchronized void init(ProcessingEnvironment processingEnvironment) {
        super.init(processingEnvironment);
    }

    //处理注解
    @Override
    public boolean process(Set<? extends TypeElement> set, RoundEnvironment roundEnvironment) {
        return false;
    }

    //获取支持版本
    @Override
    public SourceVersion getSupportedSourceVersion() {
        return SourceVersion.latestSupported();
    }

    //获取支持的注解类型
    @Override
    public Set<String> getSupportedAnnotationTypes() {
        Set<String> supportTypes = new HashSet<>();
        supportTypes.add(Inject.class.getCanonicalName());
        return supportTypes;
    }
}
init(): 初始化,可以通过processingEnvironment参数获取到一些工具类,Filer(生成代码), Messager(打印日志), Elements(获取元素信息),Types可以获取类信息
Elements elementUtils = processingEnvironment.getElementUtils();
Filer filer = processingEnvironment.getFiler();
Types typeUtils = processingEnvironment.getTypeUtils();
Messager messager = processingEnvironment.getMessager();
//获取编译参数
Map<String, String> options = processingEnv.getOptions();
process():进行注解处理的位置,他的第一个参数为待处理的注解数量,第二个参数可以理解为当前的环境,也就是编译器为我们收集到的所有的注解信息。
getSupportedAnnotationTypes():返回支持的注解类型
getSupportedSourceVersion(): 我们一般返回最新的版本
对于后面两个方法,我们也可以使用注释代替。
@SupportedAnnotationTypes 指定此注解处理器支持的注解,可用 * 指定所有注解
@SupportedSourceVersion(SourceVersion.RELEASE_7)
@SupportedAnnotationTypes({"cn.inject.annotation.Inject"})
public class InjectProcess extends AbstractProcessor {

}
注意:process()一般会回调多次,因为当第一次处理完毕以后,对于第一次生成的代码也需要扫描一次,如果没有对应的注解,则结束,如果还有,则重复前面的操作。所以我们需要根据process的第一个参数来判断。
然后为了让编译器知道我们的注解处理器在哪里,我们需要在主目录下面创建resources文件夹,然后里面创建META-INF文件夹,然后创建services文件夹,再创建javax.annotation.processing.Processor,然后写入AnnotationProcessor的绝对路径。

获取参数
很多三方框架,比如ARouter等会传递参数给注解处理器,下面介绍如何传递参数
定义参数
defaultConfig {
    javaCompileOptions {
        annotationProcessorOptions {
            arguments = ["key1": "value", "key2": "enable"]
        }
    }
}
定义的参数只能是String:String类型
获取参数
前面已经提到了,在init()方法中,我们可以通过ProcessingEnvironment参数获取到一些工具类,同样的,我们也可以获取到参数
Map<String, String> options = processingEnvironment.getOptions();
if (options != null || options.size() > 0) {
    Log.i(options.toString());
}
工具类的用法
Messager:一般用来打印日志
processingEnvironment.getMessager()
用法
public class Log {
    private Messager mMessager;

    public Log(Messager messager) {
        mMessager = messager;
    }

    public void i(String msg) {
        mMessager.printMessage(Diagnostic.Kind.OTHER, msg);
    }

    public void w(String msg) {
        mMessager.printMessage(Diagnostic.Kind.WARNING, msg);
    }

    public void e(String msg) {
        mMessager.printMessage(Diagnostic.Kind.ERROR, msg);
    }
}
Filer:用于生成Java文件,一般是用来和JavaPoet一同使用,单独也可以。
Filer filer = processingEnvironment.getFiler();
JavaFile javaFile = JavaFile.builder("com.inject.helper", injectHelper.build())
        .addFileComment("create by Inject")
        .build();
javaFile.writeTo(filer);
Types:获取类型相关
Types typeUtils = processingEnvironment.getTypeUtils();
//获取对应类型的直接父类(可以递归调用)
List<? extends TypeMirror> typeMirrors = typeUtils.directSupertypes(typeMirror);

//判断一个类型是否为Activity
private boolean isActivity(TypeMirror typeMirror) {
    List<? extends TypeMirror> typeMirrors = typeUtils.directSupertypes(typeMirror);
    for (TypeMirror mirror : typeMirrors) {
        if (CommonClass.activityName.equals(mirror.toString())) {
            return true;
        }
        if (isActivity(mirror)) {
            return true;
        }
    }
    return false;
}

//判断A是否为B子类
typeUtils.isSubtype(A,B);
Elements:元素相关
Elements elementUtils = processingEnvironment.getElementUtils();
//获取Activity元素
elements.getTypeElement("android.app.Activity");

//判断是否是Activity
private boolean isActivity(TypeMirror typeMirror) {
    TypeMirror activityTypeMirror = elementUtils.getTypeElement("android.app.Activity").asType();
    return typeUtils.isSubtype(typeMirror, activityTypeMirror);
}
Element
前面已经介绍了,对于注解的处理主要是在process方法中,我们可以通过roundEnvironment.getElementsAnnotatedWith获取到拥有指定注解的元素,我们可以看到,元素一般使用Element表示。所以在真正开始编码之前,我们需要对Element有一个基础的认识。
//处理注解
@Override
public boolean process(Set<? extends TypeElement> set, RoundEnvironment roundEnvironment) {
    //获取拥有指定注解的元素
    Set<? extends Element> elements = roundEnvironment.getElementsAnnotatedWith(Inject.class);
    return false;
}
Element:这个是一个接口,其子类有5个,分别如下。
package com.example; // PackageElement

public class Foo {      // TypeElement

    private int a;      // VariableElement
    private Foo other;  // VariableElement

    public Foo () {}    // ExecuteableElement

    public void setA (  // ExecuteableElement
                     int newA   // TypeParameterElement
                     ) {}
}
| Tables | Are |
| TypeElement | 一个类或接口 |
| VariableElement | 一个字段、enum 常量、方法或构造方法参数、局部变量或异常参数 |
| ExecutableElement | 某个类或接口的方法、构造方法或初始化程序(静态或实例),包括注解类型元素 |
| PackageElement | 一个包程序元素 |
| TypeParameterElement | 一般类、接口、方法或构造方法元素的泛型参数 |
下面分别介绍其方法
public interface Element extends AnnotatedConstruct {
    TypeMirror asType();

    ElementKind getKind();

    Set<Modifier> getModifiers();

    Name getSimpleName();

    Element getEnclosingElement();

    List<? extends Element> getEnclosedElements();

    boolean equals(Object var1);

    int hashCode();

    List<? extends AnnotationMirror> getAnnotationMirrors();

    <A extends Annotation> A getAnnotation(Class<A> var1);

    <R, P> R accept(ElementVisitor<R, P> var1, P var2);
}
可看出其实Element是定义的一个接口,定义了外部调用暴露出的接口
| 方法 | 解释 |
|---|---|
| asType | 返回此元素的类型,用TypeMirror表示,可以获知Element的数据类型 |
| getKind | 返回此元素的种类:包、类、接口、方法、字段。 |
| getModifiers | 返回此元素的修饰符 |
| getSimpleName | 返回此元素的简单名称,比如activity名 |
| getEnclosingElement | 返回封装此元素的外层元素,如果此元素的声明在词法上直接封装在另一个元素的声明中,则返回那个封装元素; 如果此元素是顶层类型,则返回它的包如果此元素是一个包,则返回 null; 如果此元素是一个泛型参数,则返回 null. |
| getAnnotation | 返回此元素针对指定类型的注解(如果存在这样的注解),否则返回 null。注解可以是继承的,也可以是直接存在于此元素上的 |
五个子类各有各的用处并且有各种独立的方法,在使用的时候可以强制将Element对象转换成其中的任一一种,但是我们需要判断其的类型。
其中最核心的两个子分别是TypeElement和VariableElement
TypeElement
public interface TypeElement extends Element, Parameterizable, QualifiedNameable {

    //返回封装此元素的所有外层元素
    List<? extends Element> getEnclosedElements();

    //返回此类型元素的嵌套种类
    NestingKind getNestingKind();

    //返回此类型元素的完全限定名称。包名+类名
    Name getQualifiedName();

    //返回类名
    Name getSimpleName();

    //获取父类类型
    TypeMirror getSuperclass();

    //获取其实现的接口
    List<? extends TypeMirror> getInterfaces();

    //获取参数
    List<? extends TypeParameterElement> getTypeParameters();

    //获取外层元素
    Element getEnclosingElement();
}
VariableElement
public interface VariableElement extends Element {

    //获取值
    Object getConstantValue();

    //获取类名
    Name getSimpleName();

    Element getEnclosingElement();
}
编码
当我们知道了每种Element的常用方法,那么我们就可以使用Filer去生成Java代码,不过推荐使用JavaPoet,相关资料可以看这里。一般来说,编写代码需要两步,第一步,收集所有的注解,第二步,生成代码。生成的代码在app\build\generated\source\apt\debug\下面可以找到。
在process方法中,我们可以通过第一个参数来判断是否需要收集,然后按照业务逻辑存储各个Element,最后使用JavaPoet去生成代码。附上本文博客所说的demo。目前只包含基础数据类型以及String,Serializable,Parcelable。对于其他复合对象,暂时不支持,最新版本可以查看github上面的说明文档。
参考链接:
Annotation Processing : Don’t Repeat Yourself, Generate Your Code.
The 10-Step Guide to Annotation Processing in Android Studio
Github地址: