前言
在前面三篇博客里面,我分别介绍了使用Java登陆教务的原理以及如何获取课表还有简单的使用ViewPager+ListView简单的实现了一下课表界面,不过这样不够直观和具体,没有分单双周以及每天的课程没有按照时间顺序排序。今天我来介绍一下,如何将我们获取到的课表信息使用格子效果展示出来。以前的三篇博客点击下面链接可进入分类查看。
课表的格子效果
还是老规矩,在介绍以前先贴出效果图,看看是否是你需要的效果。
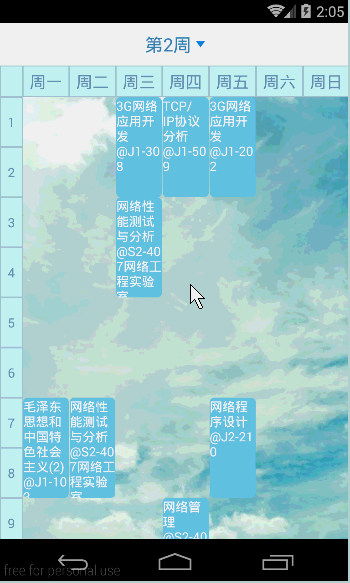
可以看到,基本效果全部实现了,包括切换当前周,自动根据课程节数设置大小,点击课程显示详细信息,还可以设置一共有多少周和一天有多少节课,其中最后一个我因为不想设计UI,所以空着了,但是代码写出来了,如果查看源码可以很清楚的看到。
在/res/strings/下有一个名为kb的项,这是我在前面几篇博客上获取的数据处理后的json字符串,用于本Demo的数据。
- 整体布局
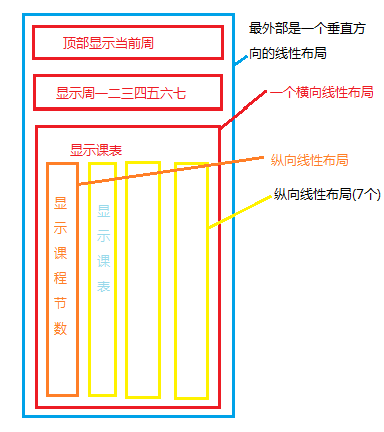
如上图所示,其实整体分为三个部分,顶部一个TextView和一个ImageView,中间星期几是一个横向的线性布局,放置8个TextView(第一个位置占位置,不显示文字)。最下面是一个ScrollView,里面有一个横向的线性布局,这个线性布局包含8个空的线性布局用于显示课表(为空的目的是,在代码中动态添加TextView)。
贴出整体布局文件。
<?xml version="1.0" encoding="utf-8"?>
<LinearLayout xmlns:android="http://schemas.android.com/apk/res/android"
    android:layout_width="match_parent"
    android:layout_height="match_parent"
    android:background="@drawable/bg"
    android:orientation="vertical" >

    <LinearLayout
        android:layout_width="match_parent"
        android:layout_height="wrap_content"
        android:background="#F7F7F7"
        android:gravity="center"
        android:orientation="horizontal"
        android:padding="10dp" >

        <TextView
            android:id="@+id/changeWeek"
            android:layout_width="wrap_content"
            android:layout_height="wrap_content"
            android:text="第一周"
            android:textColor="#3583BD"
            android:textSize="20sp" />

        <ImageView
            android:layout_width="10dp"
            android:layout_height="10dp"
            android:layout_marginLeft="5dp"
            android:src="@drawable/arrow_down" />
    </LinearLayout>

    <!-- 顶部星期一二三四五六七 -->

    <LinearLayout
        android:layout_width="match_parent"
        android:layout_height="wrap_content"
        android:background="#eeCDF5FD"
        android:orientation="horizontal" >

        <TextView
            android:layout_width="@dimen/left_width"
            android:layout_height="wrap_content"
            android:background="@drawable/boder"
            android:gravity="center"
            android:paddingBottom="5dp"
            android:paddingTop="5dp"
            android:textSize="18sp" />

        <TextView
            android:layout_width="0dp"
            android:layout_height="wrap_content"
            android:layout_weight="1"
            android:background="@drawable/boder"
            android:gravity="center"
            android:paddingBottom="5dp"
            android:paddingTop="5dp"
            android:text="周一"
            android:textColor="@color/font"
            android:textSize="18sp" />

        <TextView
            android:layout_width="0dp"
            android:layout_height="wrap_content"
            android:layout_weight="1"
            android:background="@drawable/boder"
            android:gravity="center"
            android:paddingBottom="5dp"
            android:paddingTop="5dp"
            android:text="周二"
            android:textColor="@color/font"
            android:textSize="18sp" />

        <TextView
            android:layout_width="0dp"
            android:layout_height="wrap_content"
            android:layout_weight="1"
            android:background="@drawable/boder"
            android:gravity="center"
            android:paddingBottom="5dp"
            android:paddingTop="5dp"
            android:text="周三"
            android:textColor="@color/font"
            android:textSize="18sp" />

        <TextView
            android:layout_width="0dp"
            android:layout_height="wrap_content"
            android:layout_weight="1"
            android:background="@drawable/boder"
            android:gravity="center"
            android:paddingBottom="5dp"
            android:paddingTop="5dp"
            android:text="周四"
            android:textColor="@color/font"
            android:textSize="18sp" />

        <TextView
            android:layout_width="0dp"
            android:layout_height="wrap_content"
            android:layout_weight="1"
            android:background="@drawable/boder"
            android:gravity="center"
            android:paddingBottom="5dp"
            android:paddingTop="5dp"
            android:text="周五"
            android:textColor="@color/font"
            android:textSize="18sp" />

        <TextView
            android:layout_width="0dp"
            android:layout_height="wrap_content"
            android:layout_weight="1"
            android:background="@drawable/boder"
            android:gravity="center"
            android:paddingBottom="5dp"
            android:paddingTop="5dp"
            android:text="周六"
            android:textColor="@color/font"
            android:textSize="18sp" />

        <TextView
            android:layout_width="0dp"
            android:layout_height="wrap_content"
            android:layout_weight="1"
            android:background="@drawable/boder"
            android:gravity="center"
            android:paddingBottom="5dp"
            android:paddingTop="5dp"
            android:text="周日"
            android:textColor="@color/font"
            android:textSize="18sp" />
    </LinearLayout>

    <ScrollView
        android:layout_width="match_parent"
        android:layout_height="wrap_content"
        android:overScrollMode="never"
        android:scrollbars="none" >

        <!-- 下面是一个横向的8个线性布局(1+7 1是左边的课程编号) -->

        <LinearLayout
            android:layout_width="match_parent"
            android:layout_height="wrap_content"
            android:orientation="horizontal" >

            <!-- 左边的课程编号 -->

            <LinearLayout
                android:id="@+id/leftNo"
                android:layout_width="@dimen/left_width"
                android:layout_height="wrap_content"
                android:background="#eeCDF5FD"
                android:orientation="vertical" >
            </LinearLayout>

            <!-- 一二三四五六七的课 -->

            <LinearLayout
                android:id="@+id/monday"
                android:layout_width="0dp"
                android:layout_height="wrap_content"
                android:layout_weight="1"
                android:orientation="vertical" >
            </LinearLayout>

            <LinearLayout
                android:id="@+id/tuesday"
                android:layout_width="0dp"
                android:layout_height="wrap_content"
                android:layout_weight="1"
                android:orientation="vertical" >
            </LinearLayout>

            <LinearLayout
                android:id="@+id/wednesday"
                android:layout_width="0dp"
                android:layout_height="wrap_content"
                android:layout_weight="1"
                android:orientation="vertical" >
            </LinearLayout>

            <LinearLayout
                android:id="@+id/thursday"
                android:layout_width="0dp"
                android:layout_height="wrap_content"
                android:layout_weight="1"
                android:orientation="vertical" >
            </LinearLayout>

            <LinearLayout
                android:id="@+id/firday"
                android:layout_width="0dp"
                android:layout_height="wrap_content"
                android:layout_weight="1"
                android:orientation="vertical" >
            </LinearLayout>

            <LinearLayout
                android:id="@+id/saturday"
                android:layout_width="0dp"
                android:layout_height="wrap_content"
                android:layout_weight="1"
                android:orientation="vertical" >
            </LinearLayout>

            <LinearLayout
                android:id="@+id/weekend"
                android:layout_width="0dp"
                android:layout_height="wrap_content"
                android:layout_weight="1"
                android:orientation="vertical" >
            </LinearLayout>
        </LinearLayout>
    </ScrollView>
</LinearLayout>
- 布局的初始化
在布局文件中,我们已经直接在布局文件中设置了顶部和显示星期几的部分,在代码中动态处理的是课表的显示部分。
首先初始化左边的课程节数:首先获取左边的宽高为多少,然后动态添加mMaxCouese个TextView,mMaxCouese是一个成员变量,控制一天有多少节课,此变量在配置文件读取,所以可以动态修改一天的课程总数,同理,也可以修改一学期有多少周。
/**
 * 绘制左边的课程节数
 */
private void drawLeftNo() {
	mLeftHeight = getResources().getDimension(R.dimen.left_height);
	mLeftWidth = getResources().getDimension(R.dimen.left_width);
	LinearLayout.LayoutParams lp = new LinearLayout.LayoutParams((int) mLeftWidth, (int) mLeftHeight);
	for (int i = 1; i <= mMaxCouese; i++) {
		TextView tv = new TextView(this);
		tv.setText(i + "");
		tv.setGravity(Gravity.CENTER);
		tv.setTextColor(getResources().getColor(R.color.font));
		tv.setBackgroundResource(R.drawable.boder);
		mLeftNo.addView(tv, lp);
	}
}
- 动态添加课程
终于到了重点的位置了,如何使课程编程格子效果。我在上面介绍了,每一天的课程都是一个LinearLayout,从上到下排列,当我们添加第一节的时候,肯定是从最顶部开始,这时,我们判断课程有多长,然后根据一节课的长度就可以计算出来这节课程占用的长度,每一节的长度就是上面添加左边编号时用到的mLeftHeight ,代表左边一个TextView的高度,这样我们就能控制添加课程的打消了,可是这样只能从最顶部向下一个一个的排列,你一定会我觉得我在逗你,放下菜刀,不要急,回忆一下,平常我们在布局文件中,经常设置的外边距,如果我们根据课程是第几课课,然后在它的上面计算出一个上边距不就可以了吗?具体流程就是,对于一天的第一节课,我们只需要计算它和顶部的距离,对于一天中其他的课,就只需要计算它和上一节课的距离就够了,这样我们就实现了格子效果。下面贴出代码,很多方法在课程的包装类中,可以自行下载源码查看。
/**
 * 绘制课表
 * @param ll 绘制课表到哪一个LinearLayout上
 * @param dayOfWeek 绘制的数据来自周几 一二三四五六七
 */
private void drawCourse(LinearLayout ll, char dayOfWeek) {
	// 删除所有子View
	ll.removeAllViews();
	// 上一节课结束是第几节
	int perCourse = -1;
	for (CourseBean course : mCourse) {
		// 判断是否显示这节课
		// 是不是同一天 是不是这一周
		if (course.getDayOfWeek() != dayOfWeek
				|| !course.inThisWeek(mNowWeek))
			continue;

		// 设置TextView的属性样式
		TextView tv = new TextView(this);
		tv.setText(course.getCourse_name() + "\n@"
				+ course.getCourse_address());
		tv.setBackgroundResource(R.drawable.course);
		tv.setTextColor(getResources().getColor(R.color.course_font_color));

	// 将数据绑定到TextView上
	tv.setTag(course);
	tv.setOnClickListener(new OnClickListener() {

		@Override
		public void onClick(View v) {
			CourseBean tag = (CourseBean) v.getTag();
			showCouseDetails(tag);
		}
	});

	// 设置TextView的位置
	LinearLayout.LayoutParams lp = new LinearLayout.LayoutParams(
			LayoutParams.MATCH_PARENT,
			(int) (course.getStep() * mLeftHeight));
	// 说明这节课为第一节课
	if (perCourse == -1) {
		lp.setMargins(1,
				(int) ((course.getMinCourse() - 1) * mLeftHeight), 1, 0);
		// useHeight = (int) ((course.getMaxCourse()-1) * mLeftHeight);
	} else {
		lp.setMargins(1, (course.getMinCourse() - perCourse - 1)
				* (int) mLeftHeight, 1, 0);
		// useHeight = useHeight + (course.getMaxCourse() - perCourse -
		// 1)* (int) mLeftHeight;
	}
	perCourse = course.getMaxCourse();
	ll.addView(tv, lp);
}
}
- 点击课程显示课程详细信息
在上面的代码中可以看到,每当添加一个TextView的时候,我通过setTag将对于的课程信息绑定到了TextView上,然后设置点击监听事件,点击就调用showCouseDetails()方法去显示详细信息,这个方法是我从前面写的博客里面直接复制过来的,可以点击 这里 查看,主要是使用的AlertDialog,关于AlertDialog的用法,可以查看自定义样式的AlertDialog。
- 点击顶部切换当前周
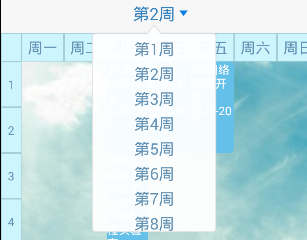
我们首先来分析下这个弹出框,这个弹出框是什么?这个弹出框是PopupWindow,这里我给他设置了一个背景图片而已,关于PopupWindow的用法可以参看PopupWindow详解与仿QQ底部弹出菜单 。里面是一个ListView,这里由于布局很简单,所以使用的是系统提供的适配器ArrayAdapter,具体实现请看代码。
/**
 * 显示切换当前周的窗口
 */
public void showChangeWeekDlg(View v) {
	View view = View.inflate(this, R.layout.changweek_layout, null);
	ListView weekList = (ListView) view.findViewById(R.id.weekList);

	ArrayList<String> strList = new ArrayList<String>();
	for (int i = 1; i < mMaxWeek; i++) {
		strList.add("第" + i + "周");
	}

	ArrayAdapter<String> adapter = new ArrayAdapter<String>(this,
			R.layout.item, strList);

	weekList.setAdapter(adapter);
	view.measure(0, 0);
	final PopupWindow pop = new PopupWindow(view, 300, 500, true);
	pop.setBackgroundDrawable(new ColorDrawable(0x00000000));
	int xOffSet = -(pop.getWidth() - v.getWidth()) / 2;
	pop.showAsDropDown(v, xOffSet, 0);

	weekList.setOnItemClickListener(new OnItemClickListener() {

		@Override
		public void onItemClick(AdapterView<?> adapter, View view,
				int positon, long id) {
			mNowWeek = positon + 1;
			pop.dismiss();
			drawNowWeek();
			drawAllCourse();
		}
	});
}
上面几点已经包含了大致所有的细节,源码下载在本文底部,如果有建议或意见,请在博客下留言,我会在第一时间回复。
源码下载 : 360云盘 访问密码 0344
整个系列最终源码 : 360云盘 访问密码 1924
您好,我想查看您的超级课表的代码用于学习,但是您的地址已经失效,能单独给我发一份吗?感激不尽
@刘嘉兴 这个很简单的,可以和你说说原理
你好!可以私聊有关你的代码么?你发的原地址已经失效了。甚是感激
@匿名 你可以加我的QQ私聊,看看右侧的信息栏
您好,可以分享一下课程格子的代码吗?我想学习一下,感激不敬!
@老黑 大半夜的….