在我们的程序运行的时候,Android系统分配给我们程序的内存是有限的,当程序使用的内存过多,就会出现OOM(Out Of Memory),最常见出现OOM的地方就是加载图片,下面我就来介绍下如何高效的加载图片到我们的程序中。
图片的大小怎么计算?
在Android中,图片一共有4中配置,分别为
A:透明度 R:红色 G:绿 B:蓝
Bitmap.Config ARGB_4444:每个像素占四位,即A=4,R=4,G=4,B=4,那么一个像素点占4+4+4+4=16位
Bitmap.Config ARGB_8888:每个像素占四位,即A=8,R=8,G=8,B=8,那么一个像素点占8+8+8+8=32位
Bitmap.Config RGB_565:每个像素占四位,即R=5,G=6,B=5,没有透明度,那么一个像素点占5+6+5=16位
Bitmap.Config ALPHA_8:每个像素占四位,只有透明度,没有颜色。
默认为Bitmap.Config ARGB_8888,也就是一个像素占用4个字节(4k)。一张1200*800像素的图片占用内存为 1200*800*4/1028/1024 = 3.6M。
1M = 1024 KB = 1024*1024 K = 1024*1024*8 位
处理的方法
对图片处理的方法有两种,第一种是降低图片质量。第二种是缩放图片尺寸,也可以把两种方法结合起来使用,避免OOM。
降低图片质量
一般情况下,用户不需要那么高精度的图片,比如显示的是一张略缩图,如果我们也是加载原图的话,而原图很大,那就很可能OOM了。
//加载低质量图片
BitmapFactory.Options options = new BitmapFactory.Options();
options.inPreferredConfig = Bitmap.Config.RGB_565;
Bitmap bitmap = BitmapFactory.decodeResource(getResources(), R.drawable.img1, options);
在上面的代码中,我门使用了BitmapFactory.Options去设置加载的属性,让程序加载的图片格式为Bitmap.Config.RGB_565,从上面的分析可以看出来,这样图片占用的内存为默认配置的一半,而在测试过程中,发现和默认效果没有很大的区别。
减少图片尺寸
如果把一个大小为1024x768像素的图片显示到大小为128x96像素的ImageView上,显然没有必要把整张原图都加载到内存中,而是将原图缩放为128x96即可。
- 获取原图的尺寸
BitmapFactory.Options options = new BitmapFactory.Options();
options.inJustDecodeBounds = true;
BitmapFactory.decodeResource(getResources(), R.id.myimage, options);
int imageHeight = options.outHeight;
int imageWidth = options.outWidth;
String imageType = options.outMimeType;
设置 inJustDecodeBounds 属性为true可以在解码的时候避免内存的分配,它会返回一个null的Bitmap,但是可以获取到 outWidth, outHeight 与 outMimeType。该技术可以允许你在构造Bitmap之前优先读图片的尺寸与类型。(在加载图片之前获取图片的大小信息)
- 设置图片的缩放
图片的缩放主要用到了BitmapFactory.Options的inSampleSize属性,默认为1,当inSampleSize大于1的时候,比如为2,那么缩放后的图片宽高均为原图的1/2,占用内存为原图的1/4,inSampleSize必须大于1才有效果,另外,官方文档指出,inSampleSize的值应该总为2的指数,比如1、2、4、8等,如果外界传递给系统的值不为2的指数,那么系统会自己向下取整,并选择一个接近2的指数的数来代替。
/**
 * 计算InSampleSize
 * @param options 需要缩放图片的配置信息
 * @param reqWidth 缩放后的宽
 * @param reqHeight 缩放后的高
 * @return 计算出的InSampleSize
 */
public int calculateInSampleSize(
        BitmapFactory.Options options, int reqWidth, int reqHeight) {
    // Raw height and width of image
    final int height = options.outHeight;
    final int width = options.outWidth;
    int inSampleSize = 1;
    if (height > reqWidth || width > reqHeight) {
        float ratioWidth = (float) width / reqWidth;
        float ratioHeight = (float) height / reqHeight;
        inSampleSize = (int) Math.min(ratioHeight, ratioWidth);
    }
    //因为系统会自己向下取整为最接近的2的指数,所以我们不处理
    inSampleSize = Math.max(1, inSampleSize);
    return inSampleSize;
}
封装为一个函数就是:
/**
 * 缩放从资源文件中加载的图片
 * @param res 资源文件对象
 * @param resId 文件id
 * @param reqWidth 需要设置的宽
 * @param reqHeight 需要设置的高
 * @return 缩放后的Bitmap对象
 */
public Bitmap decodeSampledBitmapFromResource(Resources res, int resId, int reqWidth, int reqHeight) {

    // 计算出图片的尺寸
    final BitmapFactory.Options options = new BitmapFactory.Options();
    options.inJustDecodeBounds = true;
    BitmapFactory.decodeResource(res, resId, options);

    // 计算出inSampleSize
    options.inSampleSize = calculateInSampleSize(options, reqWidth, reqHeight);

    options.inJustDecodeBounds = false;
    return BitmapFactory.decodeResource(res, resId, options);
}
测试代码
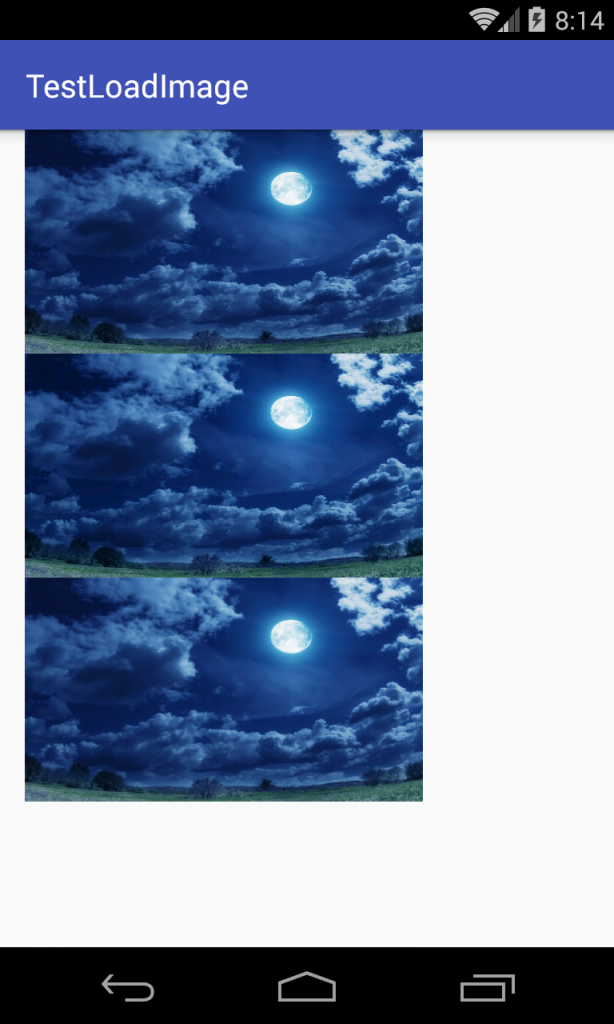
布局文件为3个ListView,用于显示原图,低质量图片,小尺寸图片。查看显示效果。
<?xml version="1.0" encoding="utf-8"?>
<LinearLayout xmlns:android="http://schemas.android.com/apk/res/android"
    xmlns:tools="http://schemas.android.com/tools"
    android:layout_width="match_parent"
    android:layout_height="match_parent"
    android:orientation="vertical">

    <ImageView
        android:id="@+id/img1"
        android:layout_width="280dp"
        android:layout_height="140dp" />

    <ImageView
        android:id="@+id/img2"
        android:layout_width="280dp"
        android:layout_height="140dp" />

    <ImageView
        android:id="@+id/img3"
        android:layout_width="280dp"
        android:layout_height="140dp" />
</LinearLayout>
主Activity代码
public class MainActivity extends AppCompatActivity {
    private Bitmap mBitmap;
    private static final String TAG = "MainActivity";
    private ImageView mImg1;
    private ImageView mImg2;
    private ImageView mImg3;

    @TargetApi(Build.VERSION_CODES.HONEYCOMB_MR1)
    @Override
    protected void onCreate(Bundle savedInstanceState) {
        super.onCreate(savedInstanceState);
        setContentView(R.layout.activity_main);

        mImg1 = (ImageView) findViewById(R.id.img1);
        mImg2 = (ImageView) findViewById(R.id.img2);
        mImg3 = (ImageView) findViewById(R.id.img3);

        //直接加载原图
        Bitmap bitmap1 = BitmapFactory.decodeResource(getResources(), R.drawable.img1);
        mImg1.setImageBitmap(bitmap1);
        //加载低质量图片
        BitmapFactory.Options options = new BitmapFactory.Options();
        options.inPreferredConfig = Bitmap.Config.RGB_565;
        Bitmap bitmap2 = BitmapFactory.decodeResource(getResources(), R.drawable.img1, options);
        mImg2.setImageBitmap(bitmap2);
        //加载小尺寸图片
        //以为在onCreate里面无法获取ImageView的宽高,所以这里先强行测量大小
        //布局文件中大小为280dp * 140dp
        mImg3.measure(View.MeasureSpec.makeMeasureSpec(dp2px(280), View.MeasureSpec.EXACTLY),
                View.MeasureSpec.makeMeasureSpec(dp2px(140), View.MeasureSpec.EXACTLY));
        Bitmap bitmap3 = decodeSampledBitmapFromResource(getResources(),
                R.drawable.img1, mImg3.getMeasuredWidth(), mImg3.getMeasuredHeight());
        mImg3.setImageBitmap(bitmap3);
        Log.i(TAG, "原图" + bitmap1.getByteCount());
        Log.i(TAG, "低质量" + bitmap2.getByteCount());
        Log.i(TAG, "小尺寸" + bitmap3.getByteCount());
    }

    /**
     * dp转px
     *
     * @param dp 待转换的dp
     * @return 打牌转px的结果
     */
    int dp2px(int dp) {
        return (int) TypedValue.applyDimension(TypedValue.COMPLEX_UNIT_DIP, dp, getResources().getDisplayMetrics());
    }

    /**
     * 计算InSampleSize
     *
     * @param options   需要缩放图片的配置信息
     * @param reqWidth  缩放后的宽
     * @param reqHeight 缩放后的高
     * @return 计算出的InSampleSize
     */
    public int calculateInSampleSize(
            BitmapFactory.Options options, int reqWidth, int reqHeight) {
        // Raw height and width of image
        final int height = options.outHeight;
        final int width = options.outWidth;
        int inSampleSize = 1;
        if (height > reqWidth || width > reqHeight) {
            float ratioWidth = (float) width / reqWidth;
            float ratioHeight = (float) height / reqHeight;
            inSampleSize = (int) Math.min(ratioHeight, ratioWidth);
        }
        //因为系统会自己向下取整为最接近的2的指数,所以我们不处理
        inSampleSize = Math.max(1, inSampleSize);
        return inSampleSize;
    }

    /**
     * 缩放从资源文件中加载的图片
     *
     * @param res       资源文件对象
     * @param resId     文件id
     * @param reqWidth  需要设置的宽
     * @param reqHeight 需要设置的高
     * @return 缩放后的Bitmap对象
     */
    public Bitmap decodeSampledBitmapFromResource(Resources res, int resId, int reqWidth, int reqHeight) {

        // 计算出图片的尺寸
        final BitmapFactory.Options options = new BitmapFactory.Options();
        options.inJustDecodeBounds = true;
        BitmapFactory.decodeResource(res, resId, options);

        // 计算出inSampleSize
        options.inSampleSize = calculateInSampleSize(options, reqWidth, reqHeight);

        // Decode bitmap with inSampleSize set
        options.inJustDecodeBounds = false;
        return BitmapFactory.decodeResource(res, resId, options);
    }
}
结果对比
Log输出为
05-11 08:10:02.906 20605-20605/com.jay.testloadimage I/MainActivity: 原图16785408
05-11 08:10:02.906 20605-20605/com.jay.testloadimage I/MainActivity: 低质量8392704
05-11 08:10:02.906 20605-20605/com.jay.testloadimage I/MainActivity: 小尺寸4196352
效果图如下,可以看到,原图加载占用内存约为16M,低质量为8M,小尺寸为4M,如果两种方式结合起来大小应该为2M,可是显示效果区别不大,所以,加载大图时,在图片要求不大的情况下应该进行处理,不然容易OOM。
延伸阅读